


Enerphit retrofit 9: replacing and upgrading the loft insulation
Posted on 23/03/23
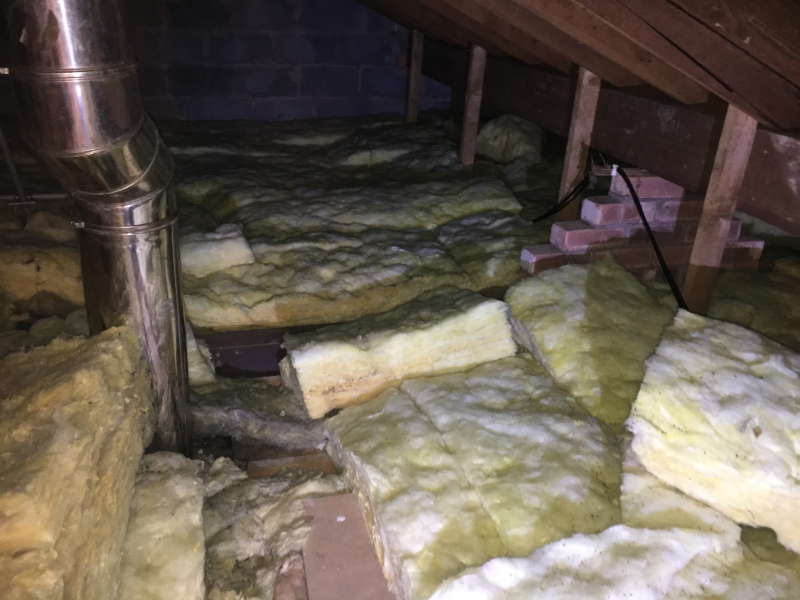
The loft in Matt’s new house had previously been insulated, initially with a 25mm roll between the ceiling joists. On inspection, it appeared that another 75mm had been added to fill the space between the joists and then, later still, another 200mm had been added over the joists. Almost 300mm of insulation doesn’t seem too bad a solution but it presented two issues:
- To achieve the EnerPHit standard for the property, there needs to be a greater thickness and,
- On closer inspection, the insulation had clearly not been installed well. There were numerous large gaps, some areas with no insulation at all, such as under the existing hot water cylinder, and other areas where it had been compressed by boards to cross the space, which substantially reduces its performance.
The modelled U value of the existing insulation was calculated at about 0.17W/m²K (assumptions had to be made because I didn’t know the date of manufacture for each type of insulation). However, the reality will have been that its performance would have been much less than this due to the poor quality of installation, meaning there were many large gaps and voids for heat to escape through.
Unfortunately, it wasn’t simply a case of quickly pulling out the old and throwing new insulation down. I had to co-ordinate with the electrician about when works could be undertaken, and mitigate the many existing electrical cables that existed and needed to remain in the loft.
Stripping out the existing hot water system and getting rid of redundant wiring
Firstly, I needed to strip out the existing hot water system, which meant a fun month with no hot water at the house! There was also a lot of redundant wiring in the loft from previous works that had to be removed once the electrician had given the all-clear.
The most difficult issue to resolve in the process was the question of airtightness. The last thing you want is moisture being able to get into the insulation from the rooms below as it will, at best, impact the performance of the insulation and, at worst, cause damp, mould and other unpleasant issues. Given each room had penetrations for power and lighting cables, a lot of effort had to be put into sealing all of these. A combination of airtight tapes, paint and expanding foams were used to address each one. Some bedrooms only had three or four penetrations in the ceiling, but the utility room, with all of the wiring and pipework for the new heating and hot water system, had eleven.
I broke the works down into separate, smaller areas, so that each area would be insulated, at least to a degree, as the works were undertaken in the some of the coldest months of the year - November, December and January.
Each area had the old insulation bagged up and the top of the ceiling swept clean. We found a lot of evidence of mice and even a few remains so I wanted to have a clean slate, so to speak, before starting to replace the insulation. Any redundant pipework or wiring was removed and the plenums (connection boxes) for the MVHR system were installed. All penetrations, including the plenums, were sealed to achieve airtightness, and any issues with the ceiling resolved – someone had clearly put a foot through the board at some point and this needed to be fixed and sealed.
Laying the insulation
A first layer of 100mm insulation was laid between the joists, tightly fitted in all directions with adjoining rolls closely butted up to one another. At this point, the ducts for the MVHR unit were installed and run back to the attenuation/distribution boxes, sitting directly onto the top of the joists and first layer of insulation. A second layer of 200mm thick loft was then installed, carefully cut round the ducting and topped up above the ducting to ensure a continuity of the insulation. Wherever possible, this second layer was laid perpendicular to the first to minimise the alignment of joints. Where this wasn’t possible, joints between layers were staggered. Lastly, the third layer (also 200mm thick) was installed. Additional insulation was added over the ducts to ensure 500mm of cover in total. This sounds like an easy task but in fact, to do it well and accurately, took the best part of 14 days of face masks, gloves, cold, hot, crawling into the eaves and generally it being a pretty horrible experience. It has easily been the worst, least enjoyable job yet done on the retrofit of the house. Given the remaining tasks I’m sure it won’t be beaten to the title either!
However, in terms of results, it has been a very worthwhile activity. As the works were undertaken on weekend days only, over the space of about three months, and because they crossed over with the installation of the new heating system, it has been easy to see the difference the additional insulation has made. Not only could you tell by feel which rooms had been insulated from those that had not yet been, but, as each room has its own programable thermostat, it was easy to monitor which rooms were calling for heat most frequently – the higher heat loss resulting in the higher demand for additional heat.
A cheap fix for the average DIYer
In terms of cost it will also be the cheapest element of the retrofit works. The fully insulated loft space now has a U value of 0.90W/m²K. At about £12/m² for 500mm thickness of insulation it is a very easy and cheap fix compared to replacing existing floors or externally insulating the walls which is the plan, subject to planning approval. I would urge anyone reading this to check their loft and see how much insulation is installed, and how well. It is a very manageable job for the average DIYer and will make a noticeable difference to both your level of comfort and your bills too.
If you are interested in finding out more about Passivhaus, which can be applied to applied across all construction sectors, from commercial and industrial, to medical and educational, please get in touch with us.
Latest posts
Join us at the Passivhaus Open days November 2023.
 30/10/23
Whilst a little late in the day we're delighted to announce that we'll be partaking in the Passivhaus...
Read more...
EnerPHit Blog Article 10: Installation of the MVHR System.
 21/08/23
One of the five core principles of Passivhaus is mechanical ventilation and heat recovery (MVHR). This...
Read more...
Completion of Small Animal Hospital at Birstall
 06/07/23
The Brief.NWD Architects were approached to support the major extension of the existing Vets4Pets surgery...
Read more...
Introducing the Future of Pet Retail: Pets at Home Unveils Innovative Store in Spalding
 23/06/23
Spalding pet enthusiasts have something exciting to wag their tails about as Pets at Home, the UK's...
Read more...
NWD Architects Ltd are recruiting.
 15/06/23
POSITION - JUNIOR CAD TECHNICIAN NWD Architects Ltd NWD are looking to appoint a Junior CAD...
Read more...