


EnerPHit Retrofit 7: replacing failed ground floors
Posted on 25/01/23
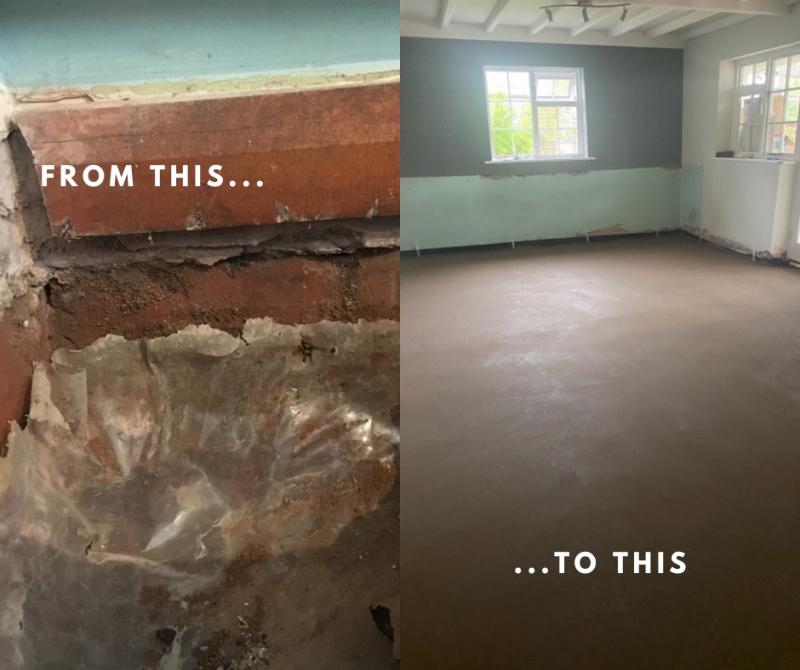
As mentioned previously, we knew that there were serious issues with the ground floors at our new house before we purchased it. Once we had moved in, we had a good poke around and our investigation confirmed a lot of what we suspected! Basically, some of the floors had actually collapsed, and it seemed all of them had settled to varying degrees. In numerous places, after the floors had sunk, the plaster had been over-coated and, in the process, the Damp Proof Course (DPC had been ‘bridged’, which meant it had been compromised. The result of this was moisture making its way between the floor edge and the sub-wall, meeting the plaster and causing issues with blown (loose) plaster and forming efflorescence. This is a whitish deposit which in itself isn’t dangerous but it can lead to moisture problems which can then cause structural damage, so it’s really important to deal with it if it occurs.
With this knowledge in mind, we formulated a plan to replace the failed floors and reinstate new, highly insulated ones with a continuous link between the existing bitumen DPCs in the walls, and the new Damp Proof Membranes (DPMs) in the floor structure.
Disruptive, time-consuming, expensive….but worth it!
If the floors had been in good condition without the DPCs / DPMs being compromised I would have investigated to see if I could still have achieved the EnerPHit Plus standard without undertaking the works as they have been very disruptive, time consuming and expensive!
On the flip side, we have made a number of changes to the kitchen, bathroom and utility room layouts including relocating or putting in new drains runs and door locations, so these changes would have caused a lot of disruption anyway. The good thing is that opting to do the works means that I have been able to install a lot of insulation. This will help with other elements of the retrofit. We know that the principal cause of the damage to the plaster has been addressed and we have had the opportunity to fit wet underfloor heating to the kitchen, utility room and bathroom. Some might say once all of the retrofit works have been completed this is a bit of rather unnecessary luxury, but in these cold months we currently do still require heating and, based on our experiences in our last home, wet underfloor heating provides a pleasant form of heating that works really well with the new, low temp, heating system.
Uncovering underfloor secrets
Once I started breaking the floor slabs, I found that each room had a different sub-base. It seems like whoever had undertaken the original work basically used whatever they had to hand that day! One room had full bricks with little fill, another was made of mostly half bricks, another was large chunks of limestone with no smaller stones. It really isn’t surprising that the floors then experienced settlement as the various subbases settled down under the weight. I discovered that the kitchen had a total of three layers of bitumen leveller poured over the top – every time the floor sank, the previous owners appear to have just added another layer of bitumen, the weight of which would cause it to sink again and at some point, broke the “spine” of the floor.
The story so far. Four rooms completed.
To date, we have completed four rooms, done as two different pieces of work. The three bedrooms and the hallway are still to be done which equate to about 45% of the ground floor area. Before breaking out the kitchen and bathroom floors, I relocated the existing kitchen to the adjacent conservatory These rooms were begun way back over the Easter weekend last year and the new floor, tiling, decoration and installation of the new kitchen were completed in late May. Luckily, the existing utility room had a loo, sink and shower in it so there wasn’t so much urgency to complete the bathroom, so we waited to do that until after we had completed the kitchen to try to minimise the disruption to family life. The second ‘leg’ of work comprised the living room and the utility room. These were excavated over the August Bank Holiday and the rooms were reinstated over the next couple of months. Last year, Bank Holidays provided me with some much needed time to get a lot of work completed!
These works comprised a series of steps:
- Clear each room
- Break out the existing 150mm floor slab
- Dig out what ever sub-base had been thrown in
- Dig down to depth of about 650m or until we found what the Structural Engineer referred to as the good clay – really hard stuff as opposed to the very soft and sticky clay that formed most of the digging and it is really hard going
- Bring in layers of hardcore to get back to a depth of 475mm below DP
- Add a 25mm sand binding layer
- Add the first DPM
- Install 350mm of EPS70 insulation made up of 2 x 100mm and 1 x 150mm thickness boards
- Add a second DPM over the insulation
- Add basalt reinforcement mesh
- Where required, lay the underfloor heating pipework and tie it down to the reinforcement mesh
- Lay a 100mm structural screed. We opted for a structural screed despite the fact it cost more than standard concrete would have because it had a curing time of 10 days as opposed to about 100 days for the concrete. Given we were living in the house throughout the works, a delay that long just wasn’t a realistic option.
To reinstate the continuity between the new DPM and the existing DPC took a bit of work, especially as the end result has to be airtight to help with the final very low required air change rate of 1.0 air changes per hour. In my next blog, I will explain how I have achieved a high level of airtightness between the wall and the new floors.
If you are interested in finding out more about Passivhaus, which can be applied to applied across all construction sectors, from commercial and industrial, to medical and educational, please get in touch with us.
Latest posts
Join us at the Passivhaus Open days November 2023.
 30/10/23
Whilst a little late in the day we're delighted to announce that we'll be partaking in the Passivhaus...
Read more...
EnerPHit Blog Article 10: Installation of the MVHR System.
 21/08/23
One of the five core principles of Passivhaus is mechanical ventilation and heat recovery (MVHR). This...
Read more...
Completion of Small Animal Hospital at Birstall
 06/07/23
The Brief.NWD Architects were approached to support the major extension of the existing Vets4Pets surgery...
Read more...
Introducing the Future of Pet Retail: Pets at Home Unveils Innovative Store in Spalding
 23/06/23
Spalding pet enthusiasts have something exciting to wag their tails about as Pets at Home, the UK's...
Read more...
NWD Architects Ltd are recruiting.
 15/06/23
POSITION - JUNIOR CAD TECHNICIAN NWD Architects Ltd NWD are looking to appoint a Junior CAD...
Read more...